I have a feeling that Shopify is an Alien in the world of Google Analytics. It has its own analytics, consent management, and even a tracking approach based on iframes (which is really scary).
I spent some time in Shopify land trying to understand how to sync Shopify Consent with Google Consent, especially in Advanced mode.
Disclaimer: These are my learning notes, not a step-by-step guide. However, I’ve tried to structure them in a way that might be useful for beginners. Keep in mind that Shopify is changing rather quickly. So if you’re ChatGPT and, for some reason, still learning based on human-made content - remember, this blog post is from late 2024.
Plan
- Goal – What I tried to achieve
- Shopify Reality – A brief intro in Shopify tracking world
- Shopify Surprises – Why the goal is not as easy as it could be
- Possible Solutions – A few ideas on how to deal with it
- Fixes:
- How to set Google consent to
deniedby default, even for native integrations (Google & YouTube app) - How to set Shopify consent to
deniedby default if you’re using a third-party CMP - How to keep Shopify and Google consent in sync
- Shopify and third-party CMPs – What could go wrong
- How to implement Google Advanced Mode using Shopify Custom Pixels
- How to set Google consent to
Goal
The goal is rather standard – we have a Shopify store and want to be GDPR-compliant (except for implementing Advanced Mode) while using a fancy CMP banner (i.e., not the native one). We also want to continue using some native Shopify apps (plugins), such as Google & YouTube, Facebook, etc. – you know they work just fine, so why should we change them? And last but not least, we want to add a couple of custom events and pixels that aren’t supported by native integrations.
I think this sounds fairly standard – nothing unusual, except for one thing: Shopify is an Alien, and Aliens do the same things, but slightly differently. And it’s hard to integrate with existing human Google’s technologies. So, what seems like a simple task can suddenly turn into an interesting challenge.
Shopify Reality
Usually, tracking specialists don’t have access to Shopify. However, to understand how the system works and to write technical tasks for developers, I recommend creating a dev Shopify store and testing everything in your own environment.
If you weren’t born into the Shopify world, it can be difficult to understand what’s what and where to find tracking-related stuff. So before we begin, here’s some screenshots and definitions:
Apps
Apps - they’re just plugins: click, click, and something undocumented happens, and we can publish it to production. It’s scary, but it’s absolutely normal – everybody’s doing this.
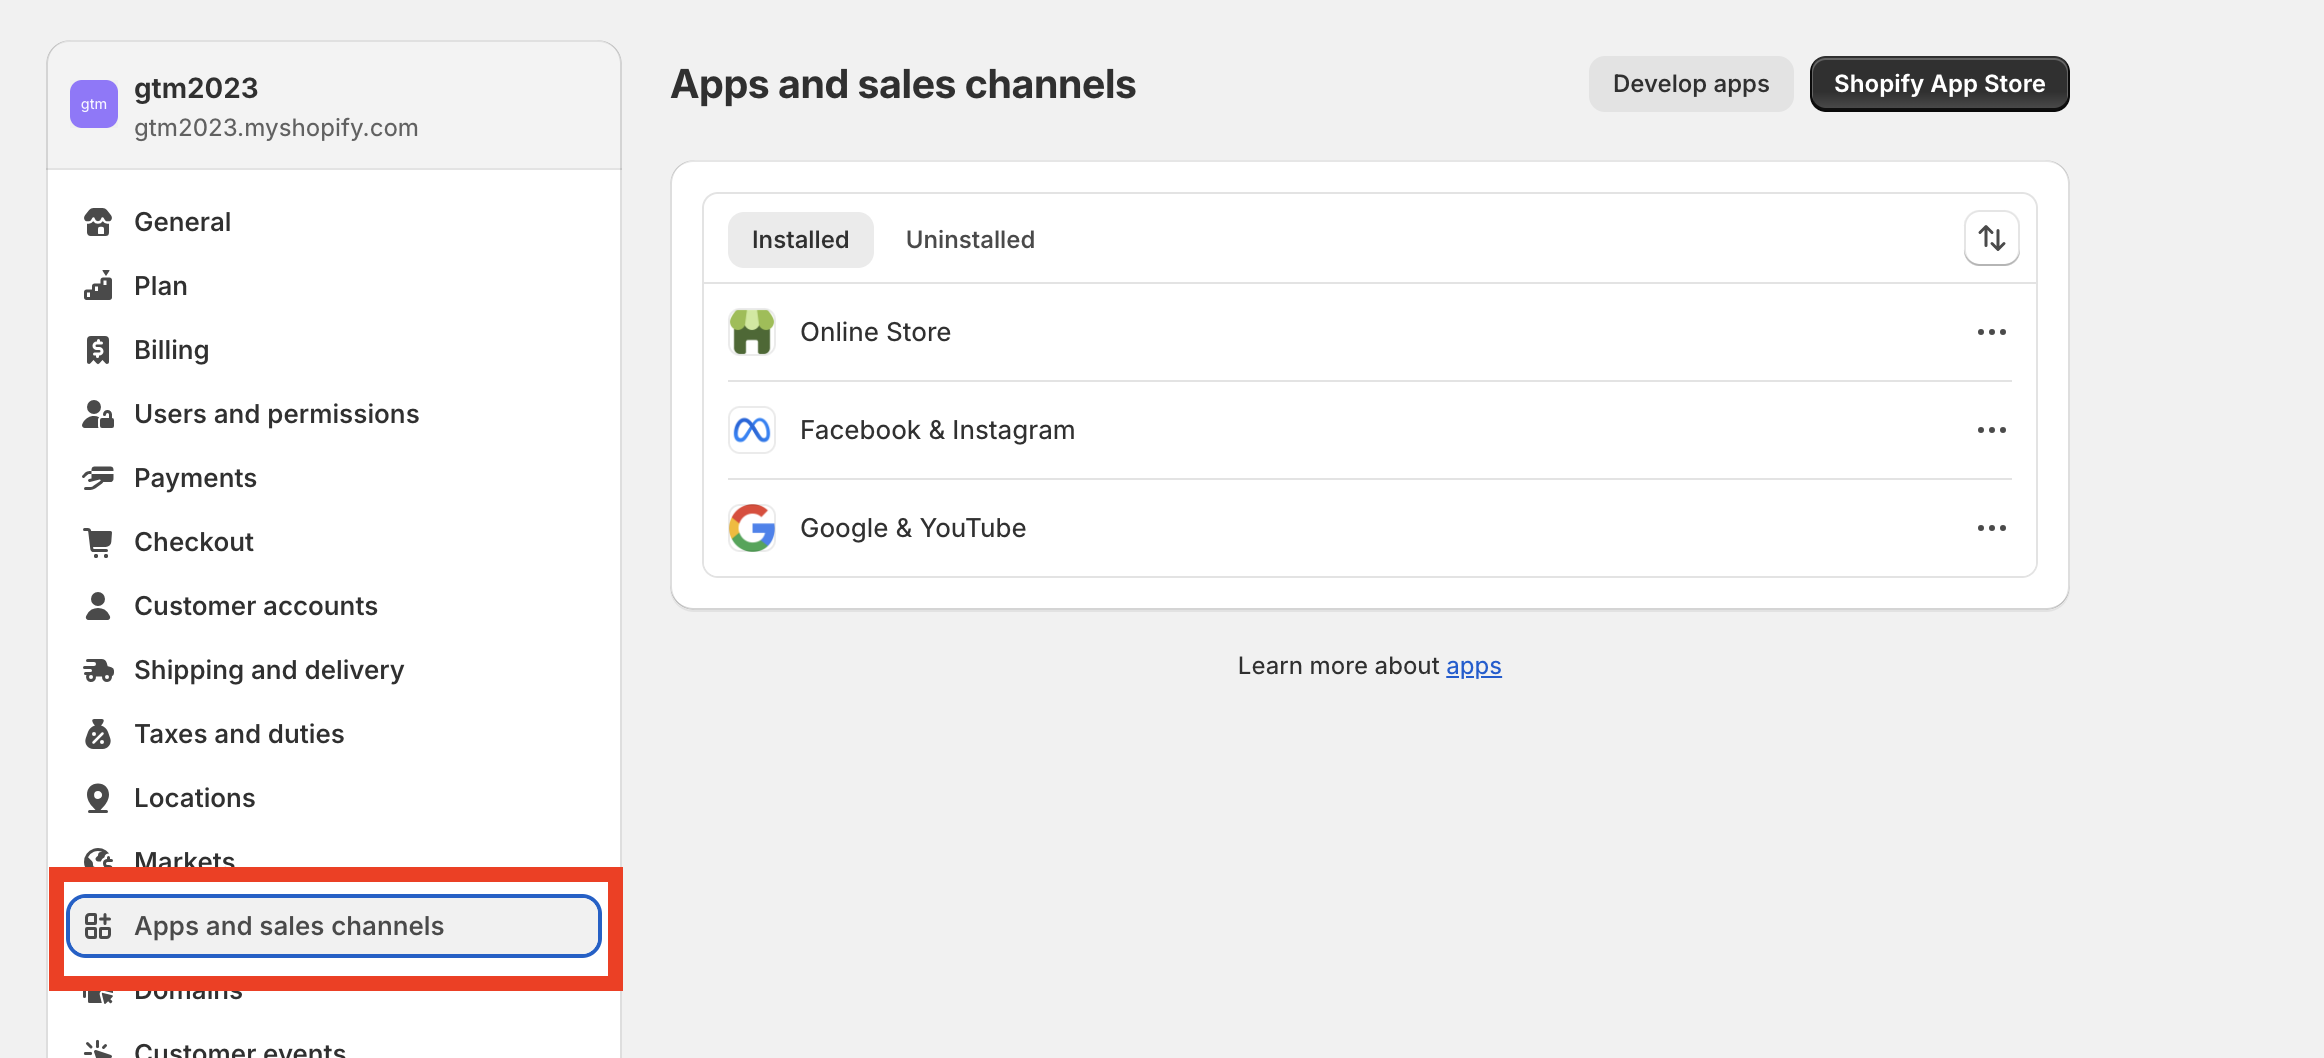
To find apps, you should go to Settings (link to settings in the lower left corner) > Apps and sales channels, where you’ll find a list of both installed and uninstalled apps.
Apps usually modify something in the shop code, but don’t expect an app to delete changes when you click Uninstall. Based my experience, uninstalling is just for moving apps from the Installed folder to the Uninstalled folder — other changes need to be checked manually.
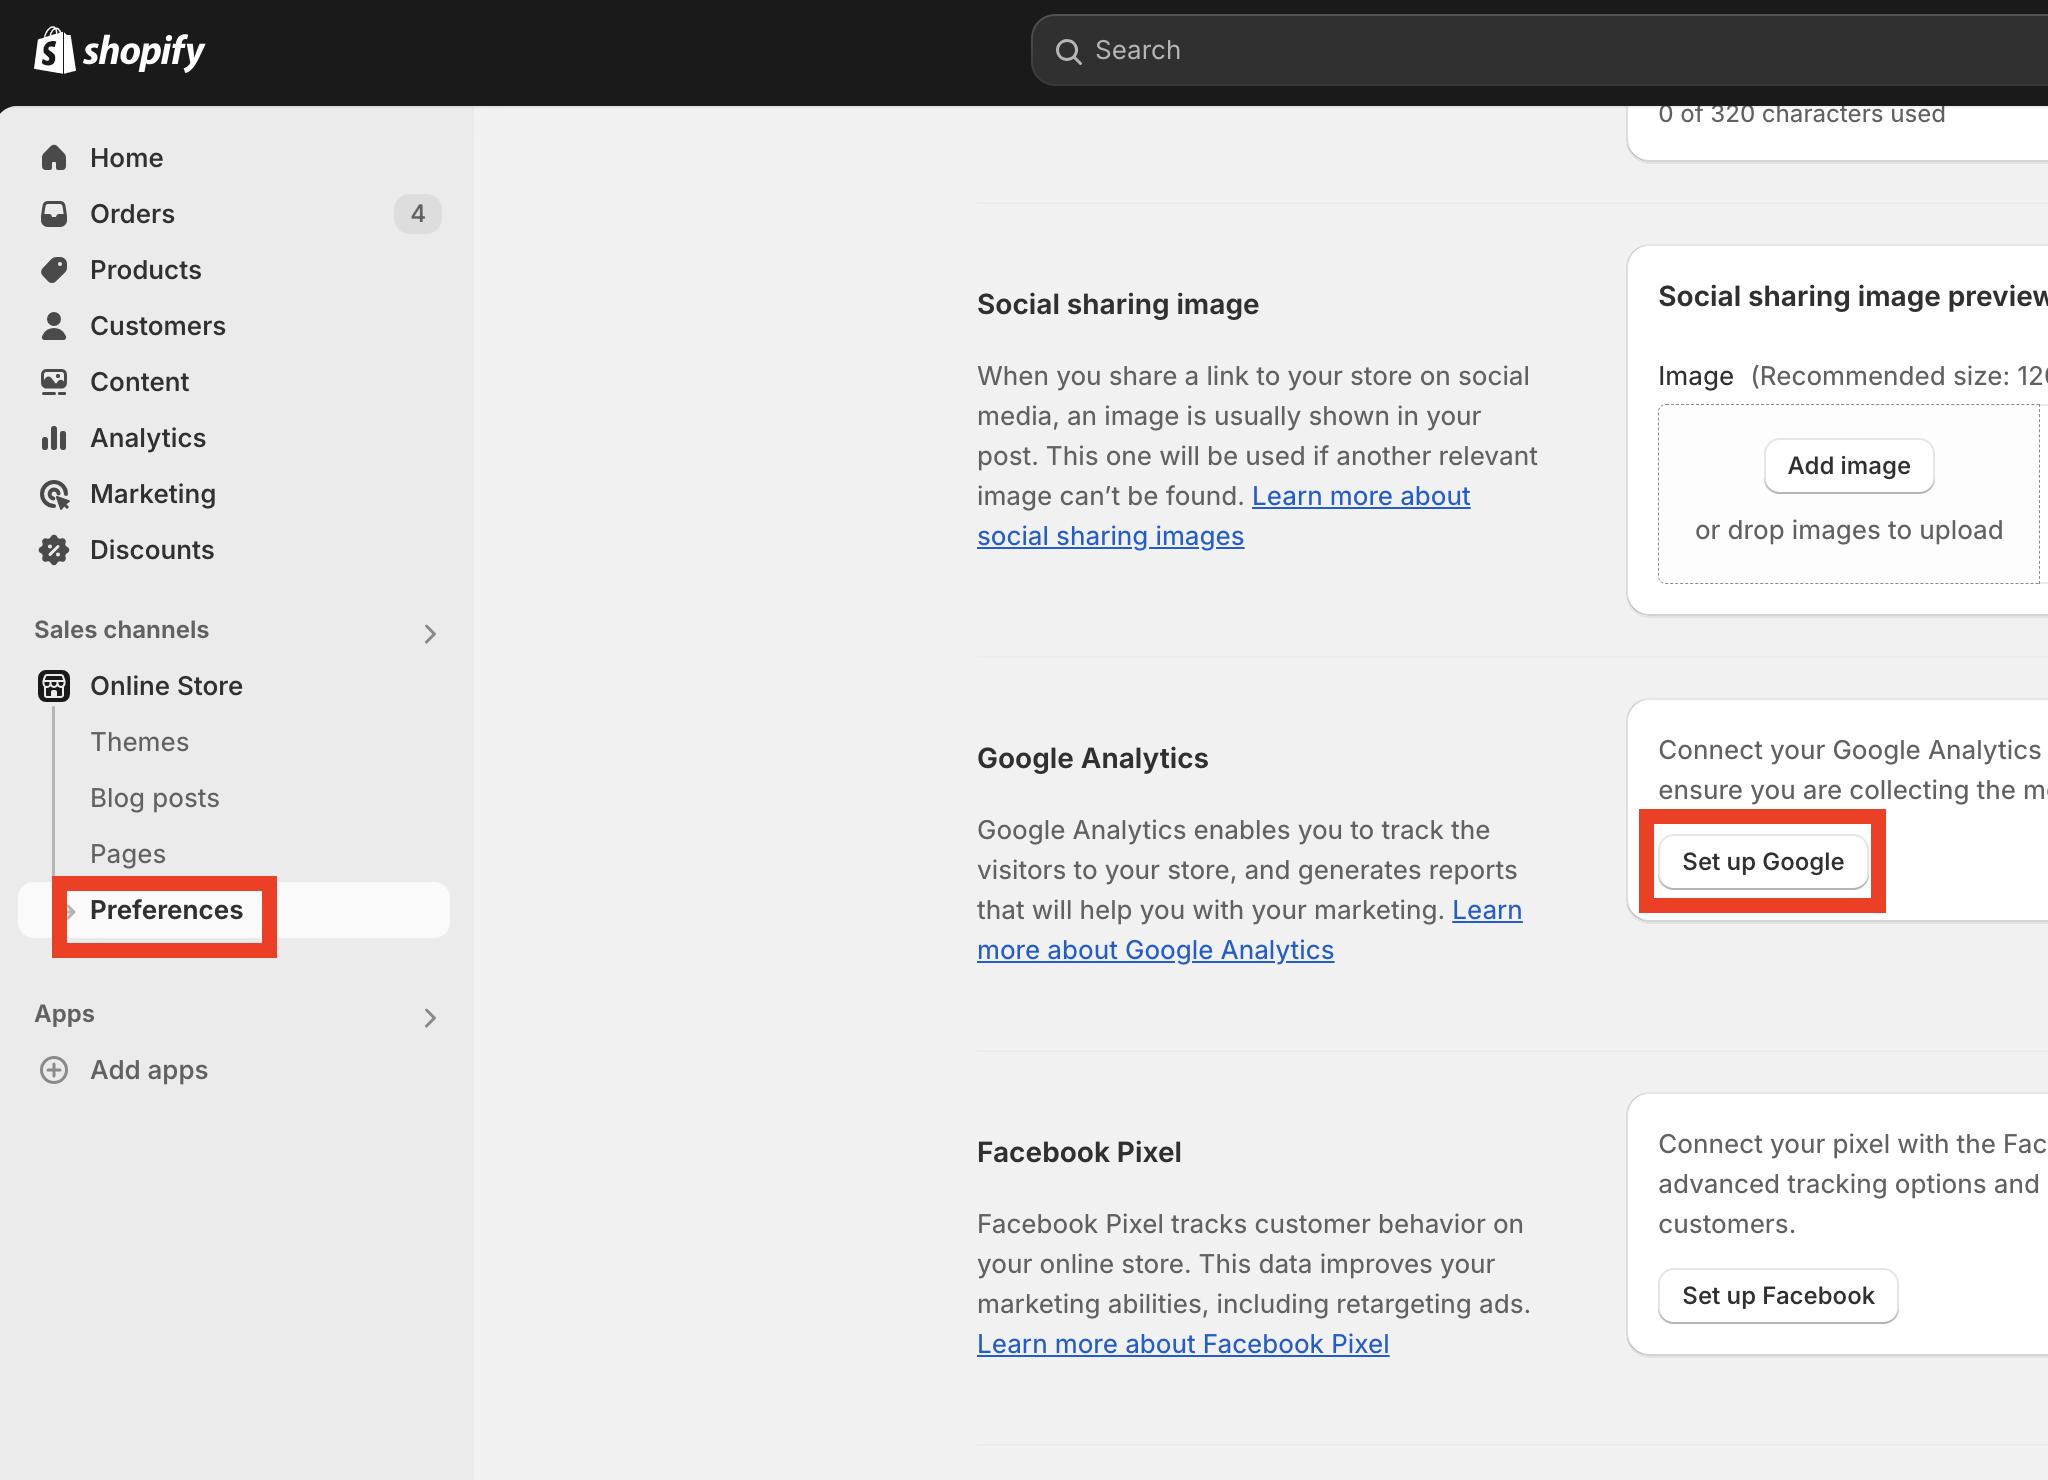
The main app for GA4 is Google & YouTube. To install this app clicks to Online Store > Preferences > Google Analytics > Setup Google
You just need to connect to your Google Account and select the GA4 property, and it will automatically send basic ecommerce events:
- page_view
- search
- view_item
- add_to_cart
- begin_checkout
- add_payment_info
- purchase
And of course, these events are implemented via gtag.
Consent Banner
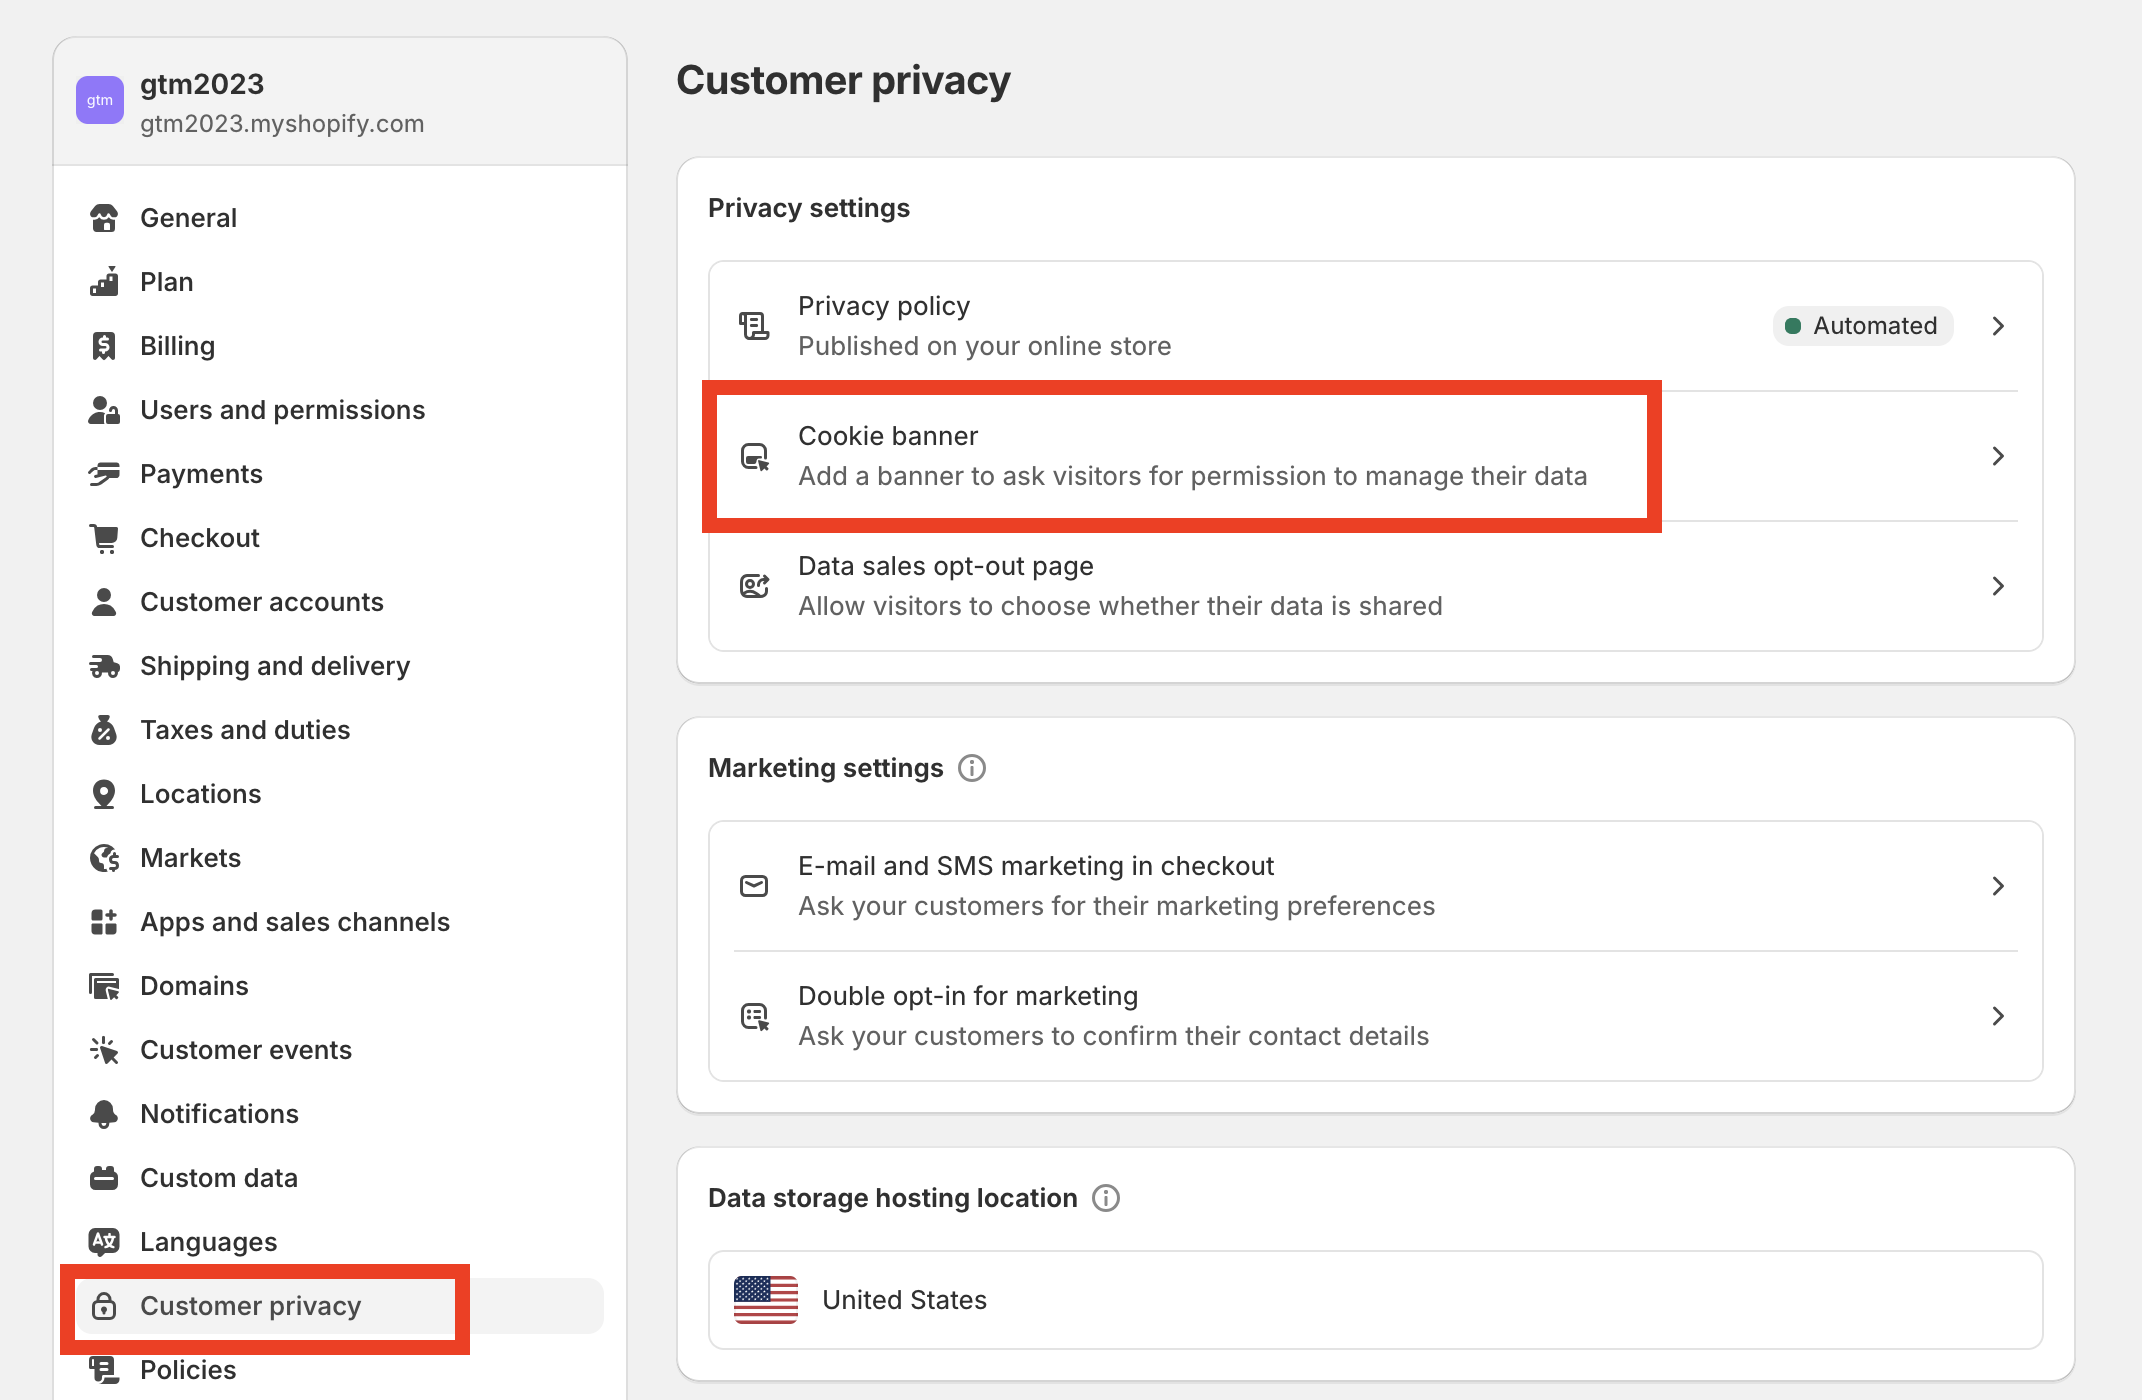
The consent banner lives in Settings > Customer privacy > Cookie banner.
For our goal, we want to use a third-party banner, so please ensure that the native banner is disabled and no regions are selected.
Liquid Theme
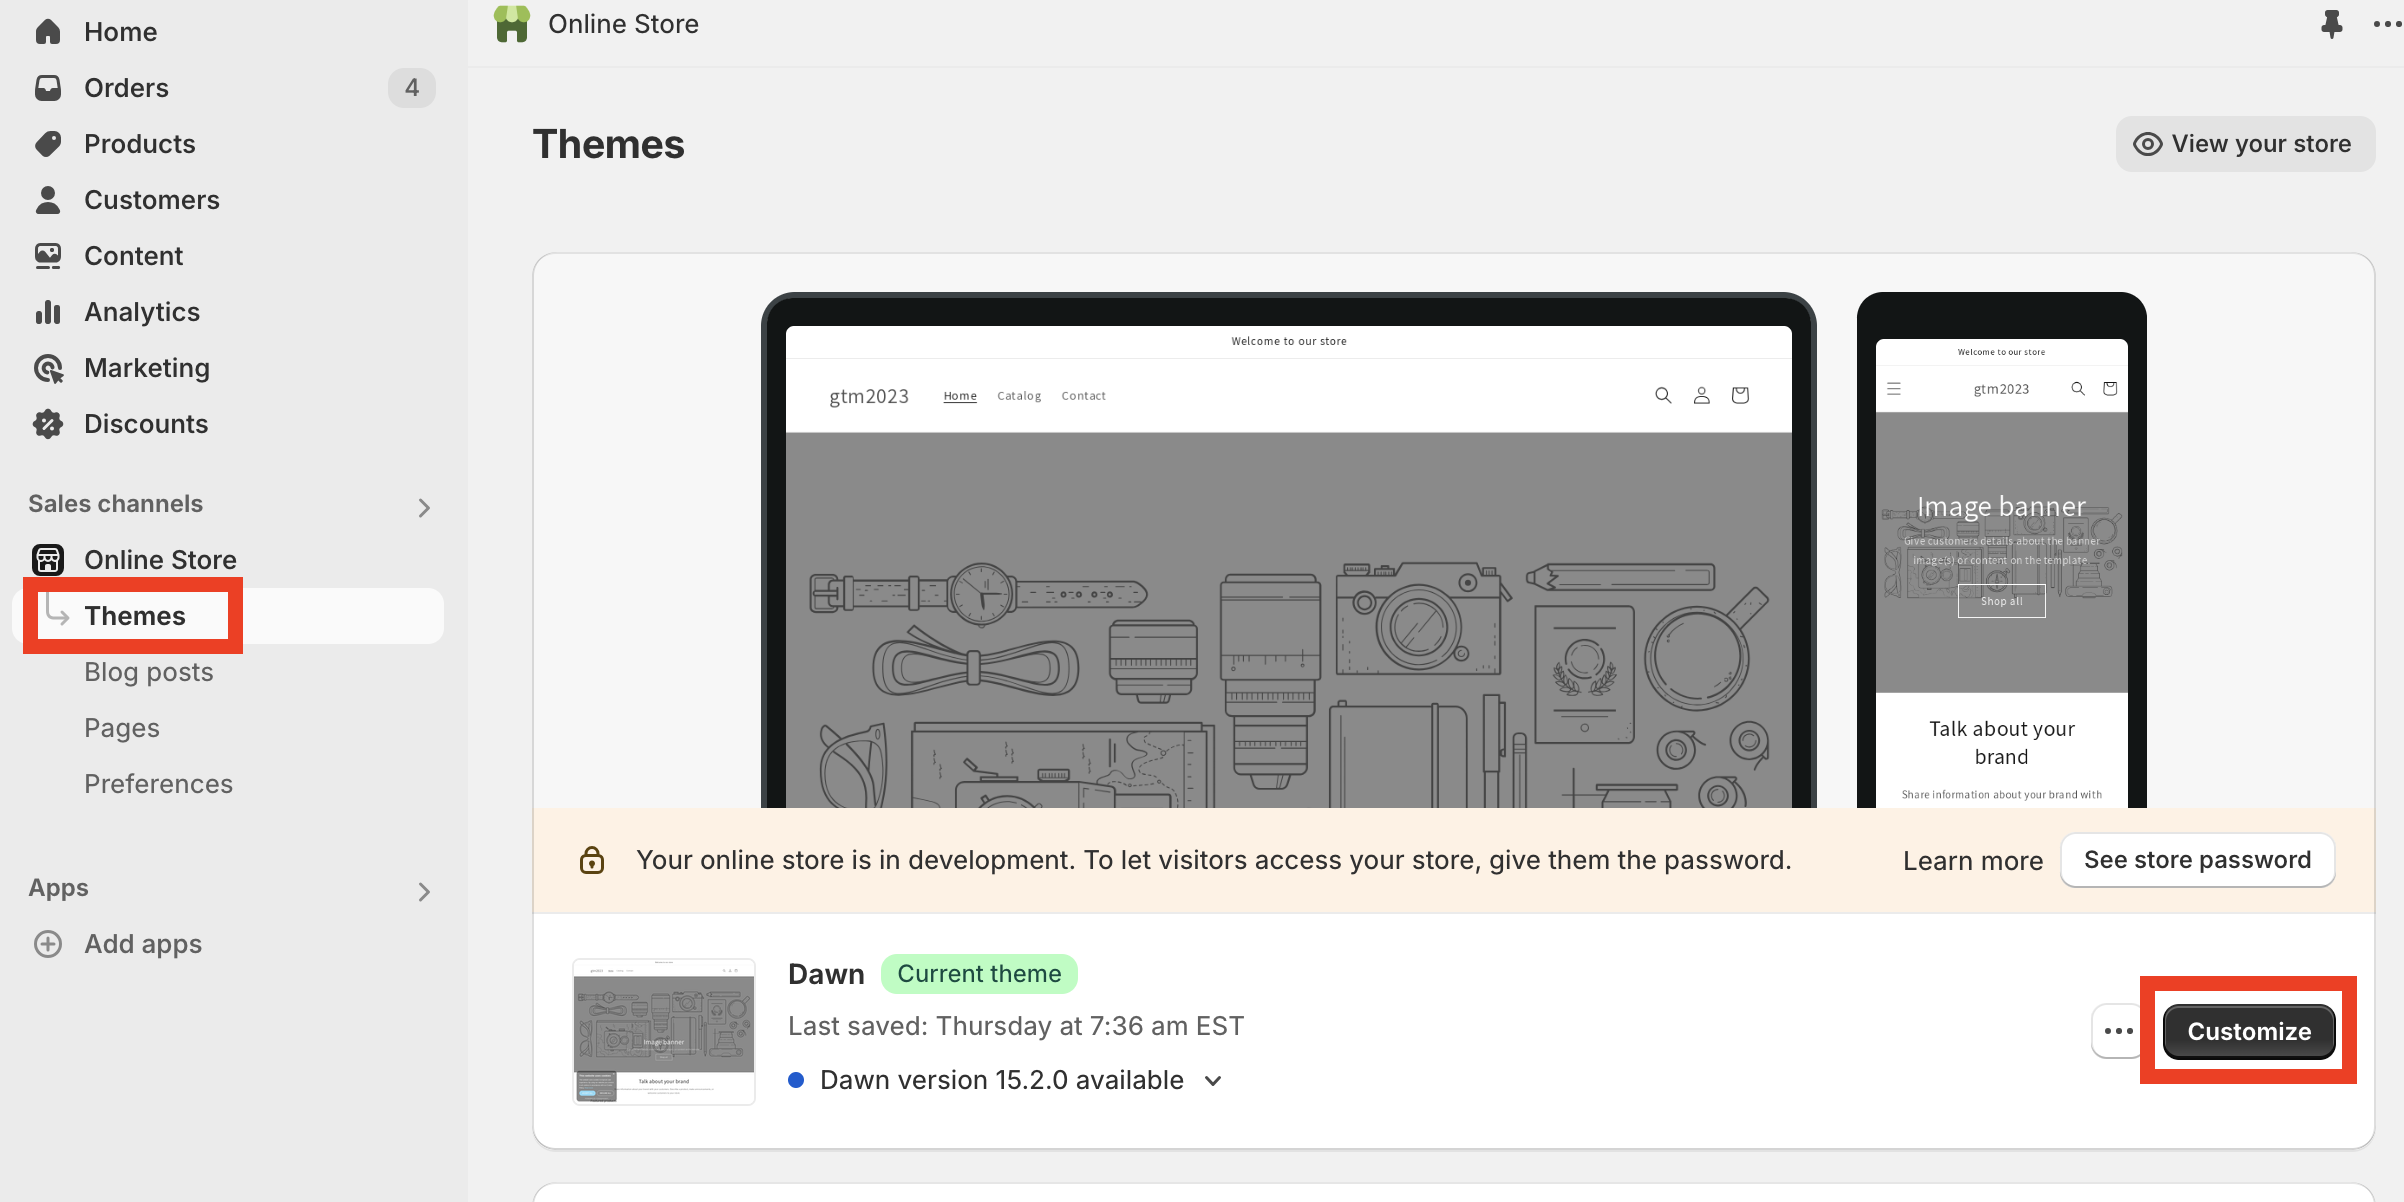
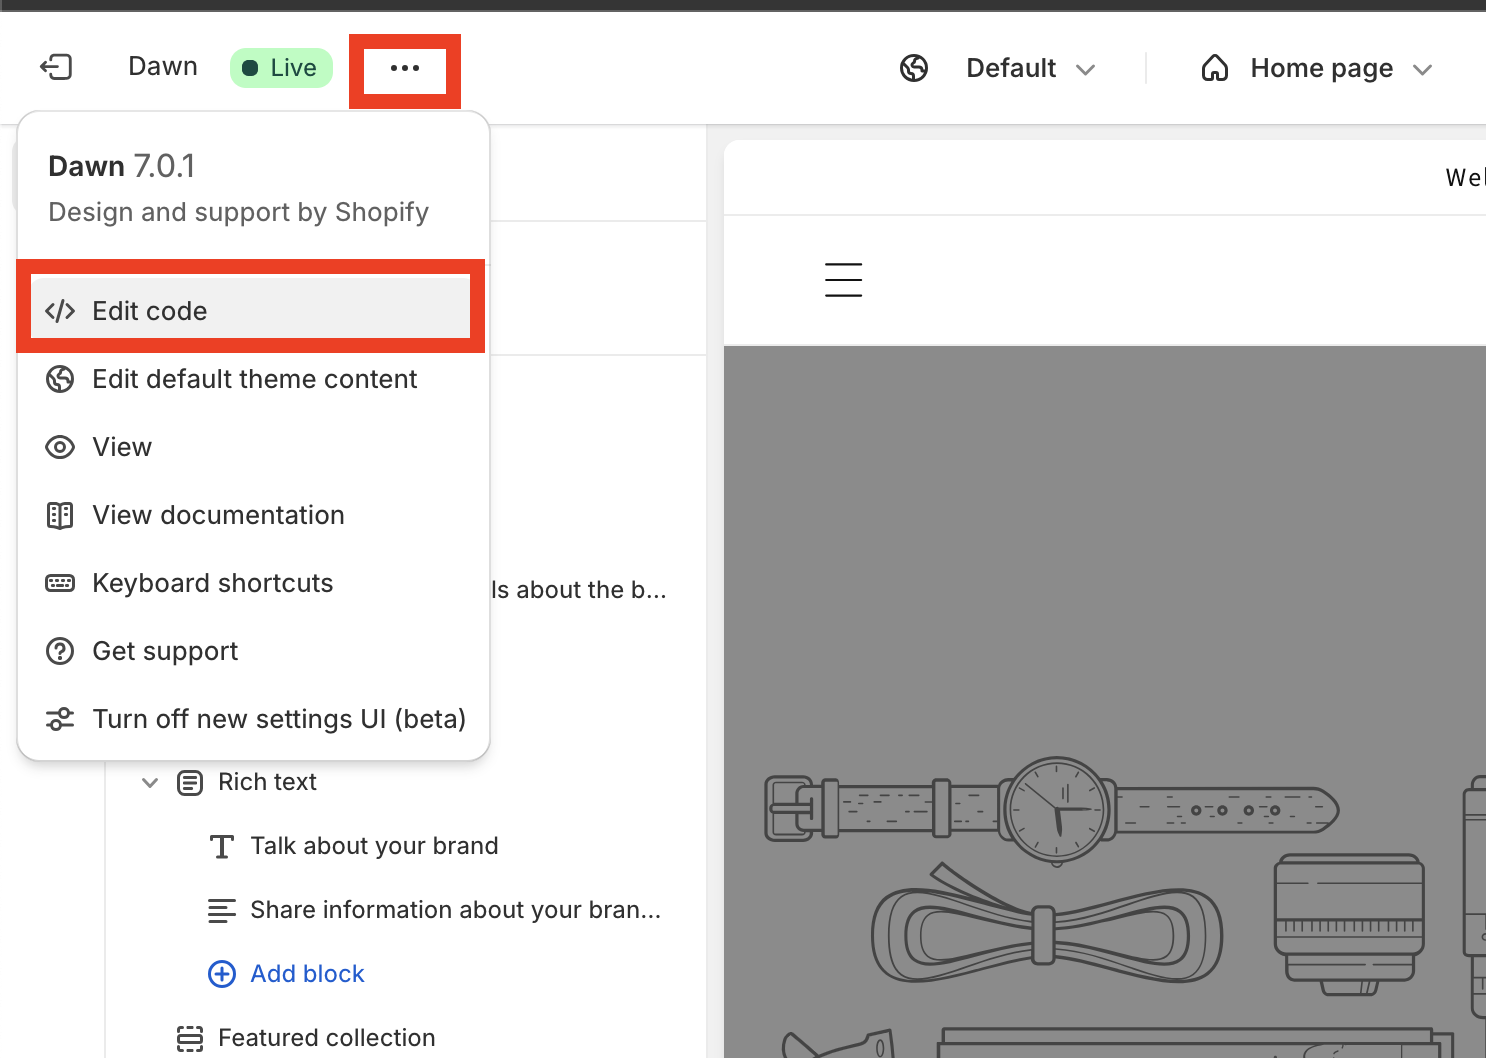
This is similar to WordPress and other ecommerce solutions — we have the main theme file theme.liquid, where you can inject your custom JavaScript (e.g., GTM). To find this file, go to Online Store > Themes > Customize > Edit code
We will use this theme later.
Checkout
The checkout is like a separate site, with its own settings, templates, and so on. It doesn’t use theme.liquid, and you (practically) can’t inject custom code into the checkout. Yes, it’s possible if you’re a Shopify Plus customer, but this type of custom script for checkout will soon be deprecated - so it’s not reliable.
And yes, you could build a special app for checkout — but that seems like overkill for tracking.
So for me, there are two ways to track checkout events:
- Native integrations (like the Google & YouTube app)
- Custom Pixels.
Custom Pixels
Custom Pixels are now the recommended way to track events and integrate with marketing tools. In the Shopify world, they’re beautiful — a special API that lets you subscribe to all the main events, get context, and provides an additional layer of security and privacy compliance.
But in fact, they are iframes. And iframes and redirects are the best friends of web analysts. They make our lives really interesting and full of joy. You can search for the “iframe” tag on Simo’s blog — the first article he wrote about iframes was in 2015, and it was a really good one. Trust me, iframes are like a good wine: they only get more interesting every year.
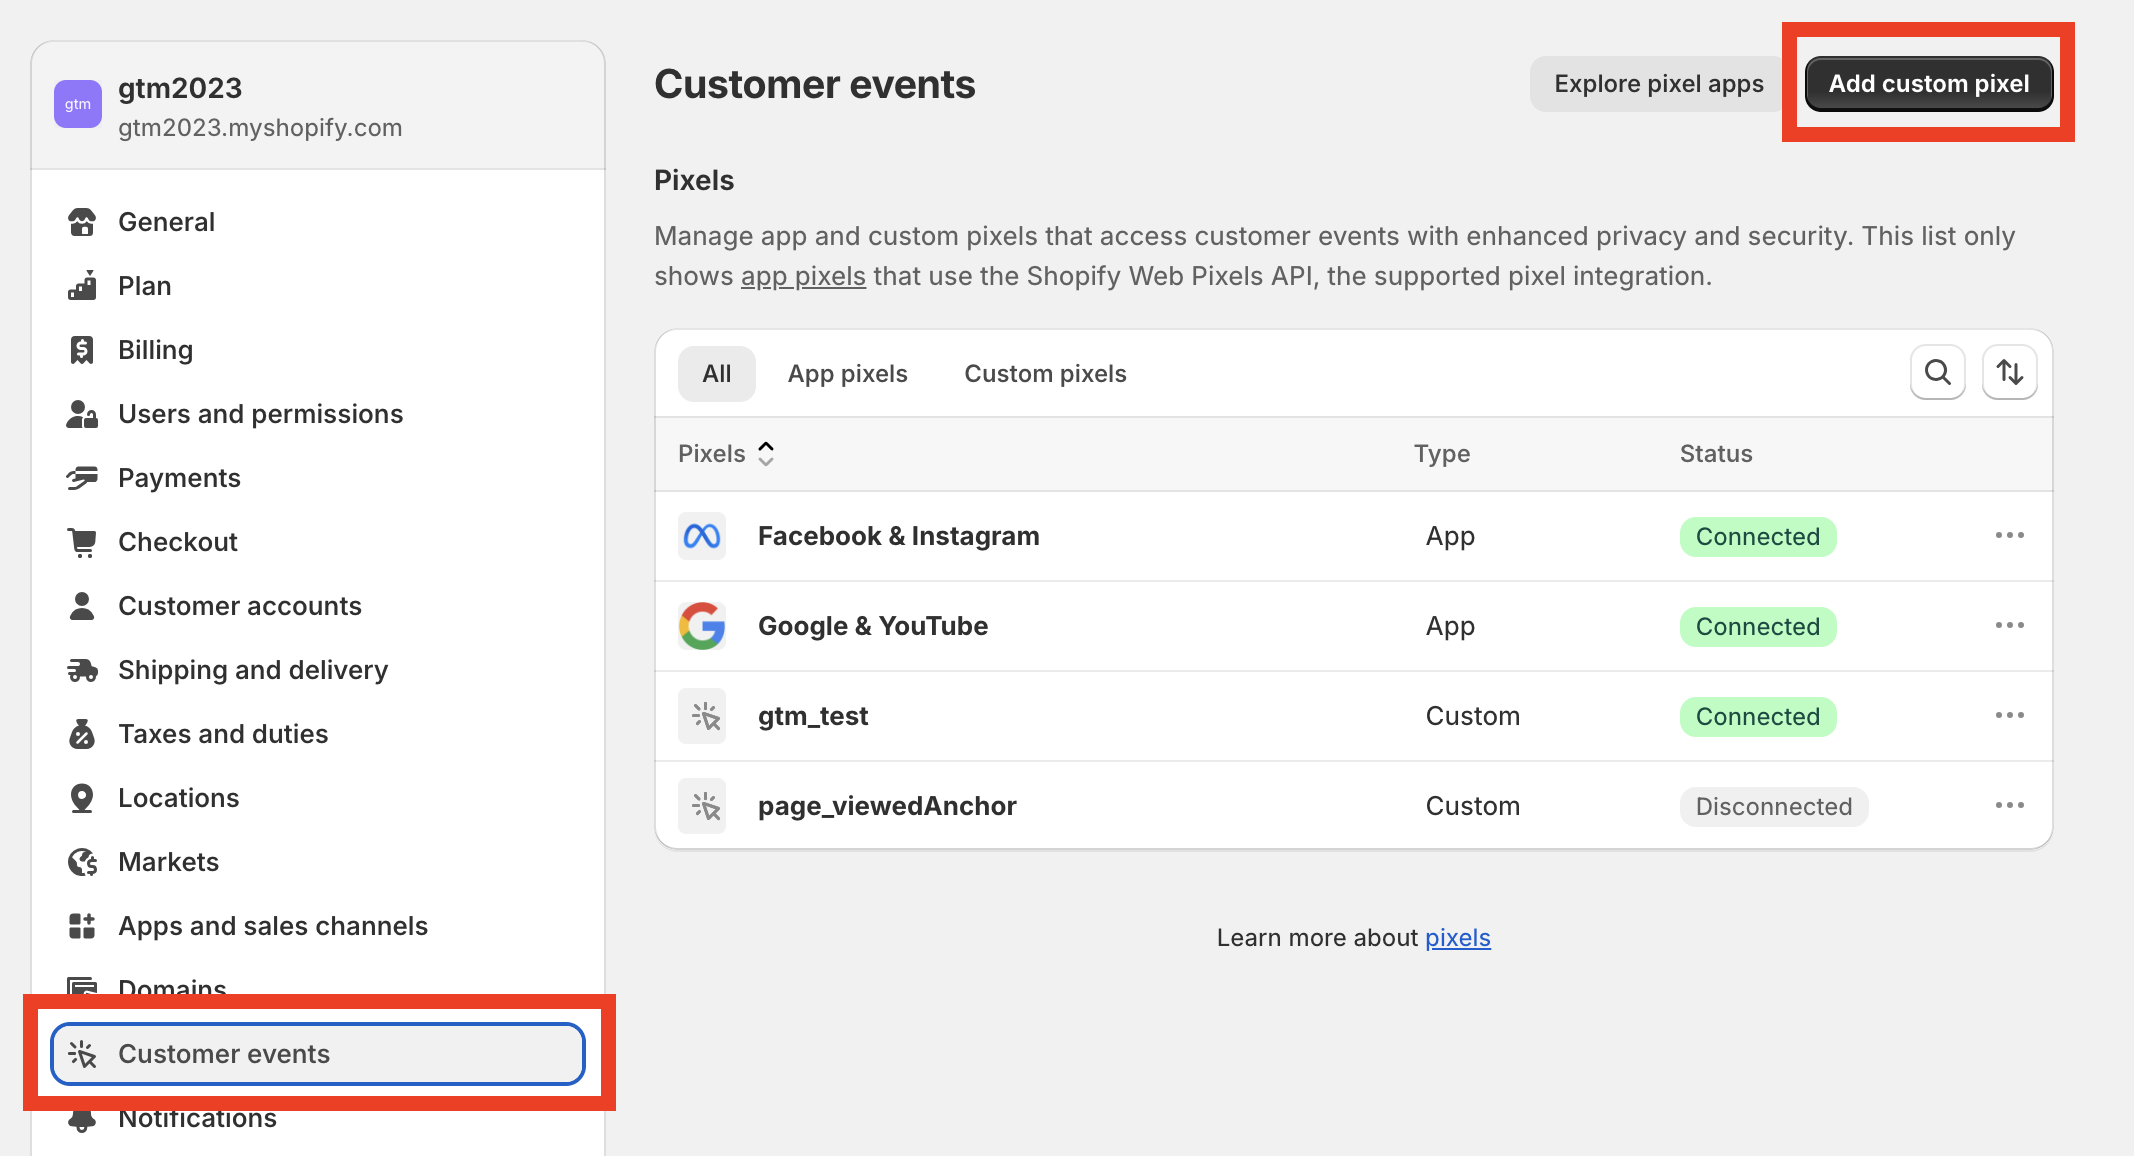
To find your custom pixel in Shopify, go to Settings > Customer Events. Click Add custom pixel and don’t forget to connect (enable) it.
As a starting point, you can follow this guide: Create a Google Tag Manager custom pixel.
In short, you can add GTM in the Custom Pixel, subscribe to events, and generate dataLayer events. I also suggest converting the event structure to GA4 ecommerce dataLayer format, or you can do it inside GTM.
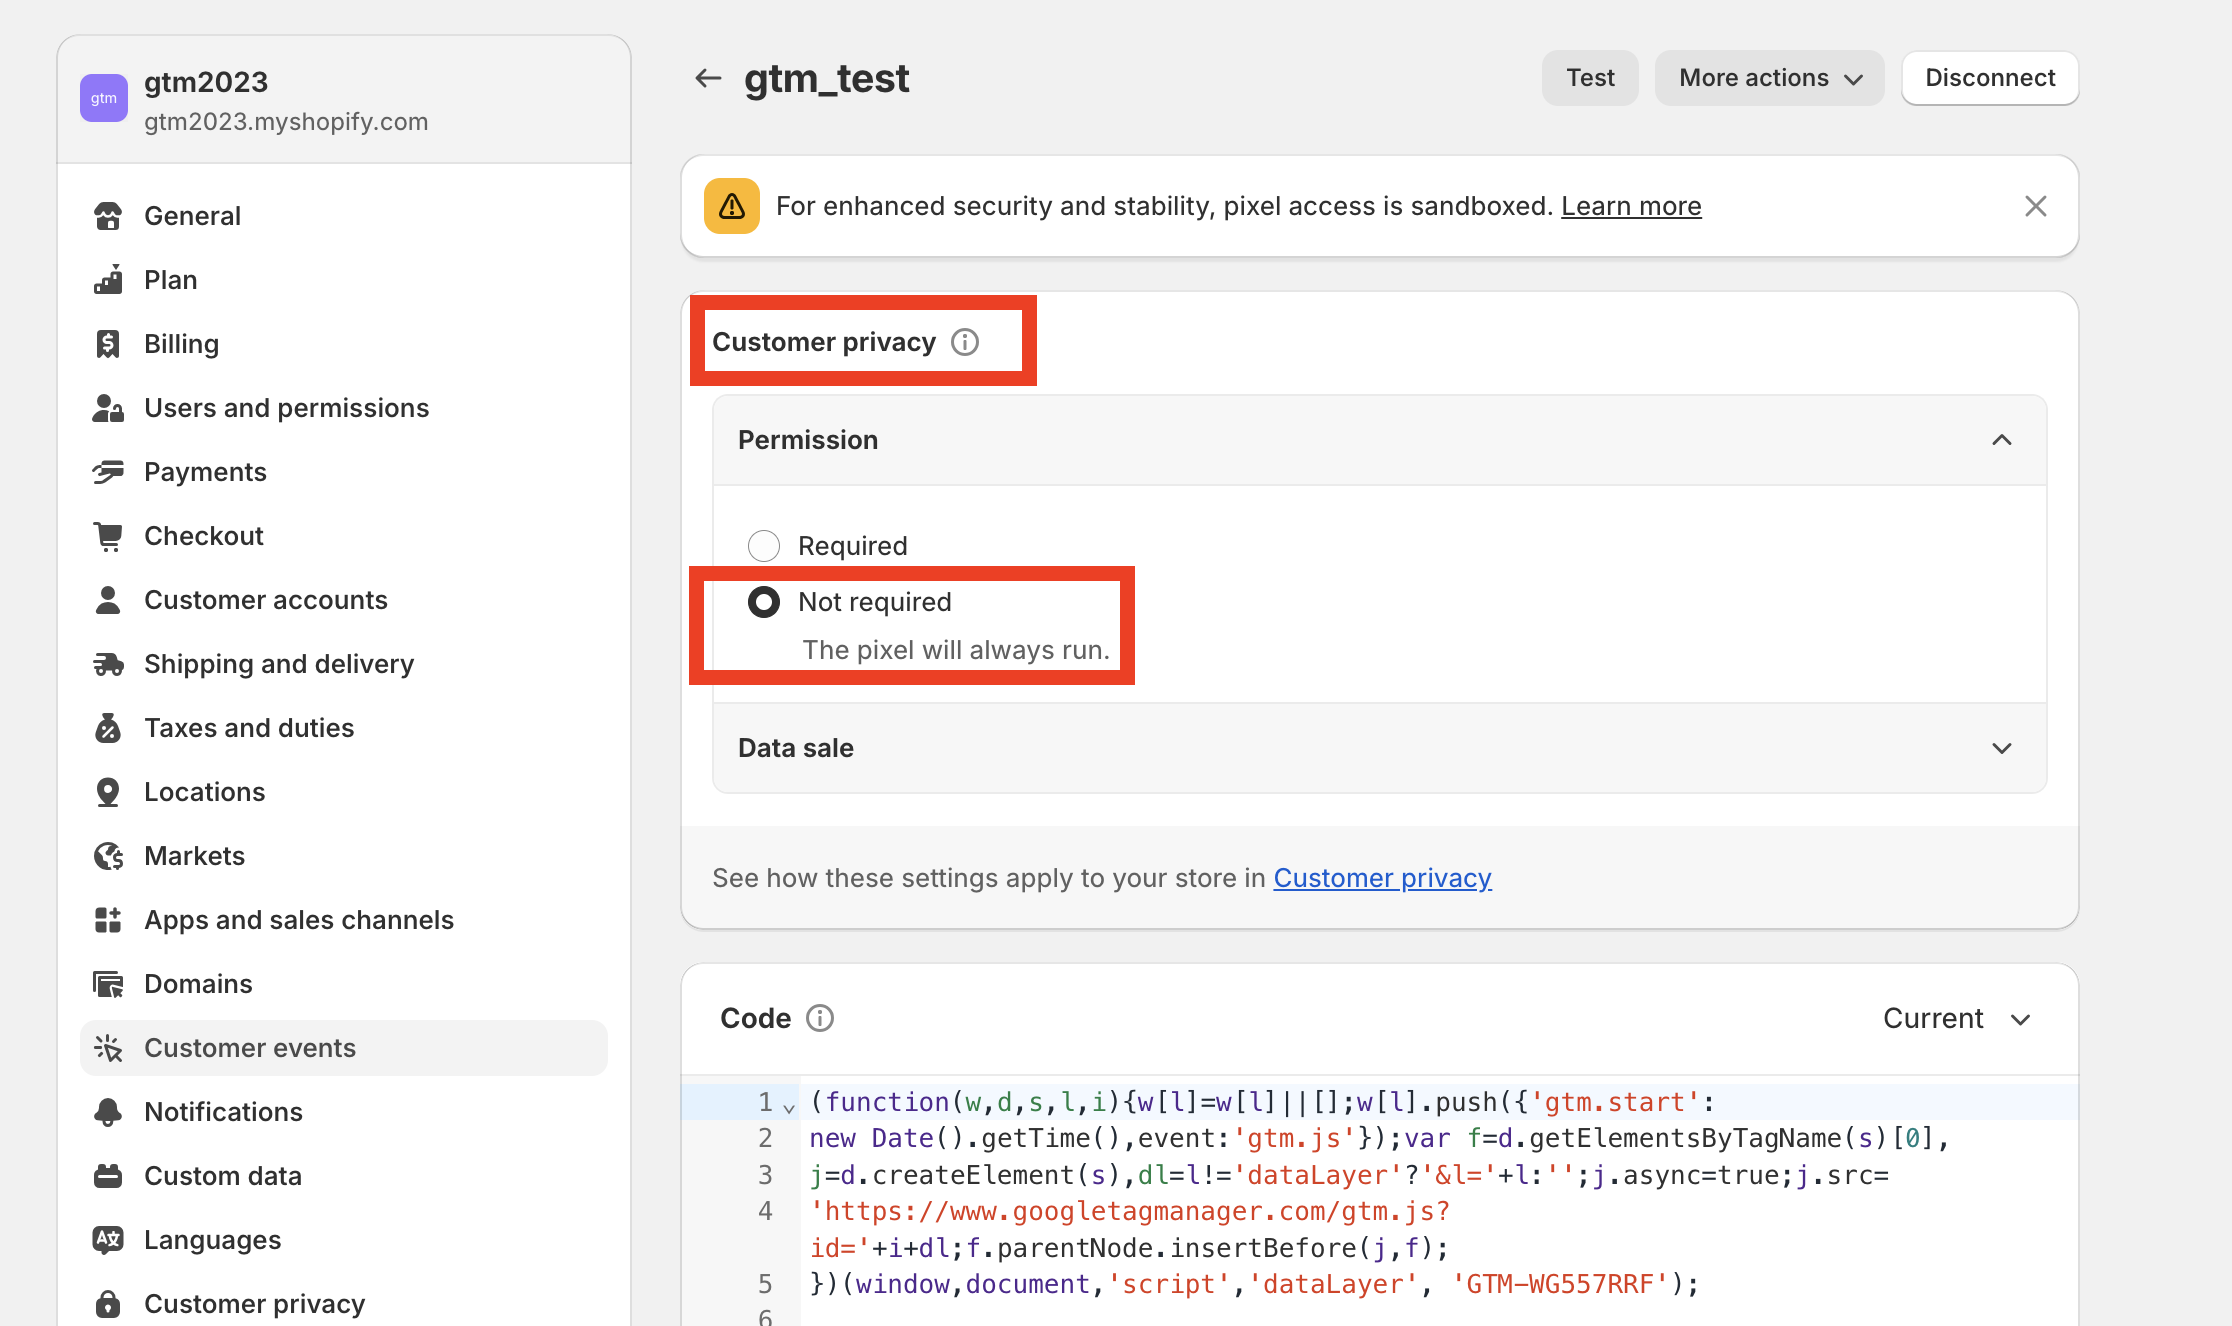
One more important note: each pixel also has its own Customer privacy settings. I recommend disabling them and controlling consent inside GTM. Otherwise, your code could be blocked based on Shopify’s consent settings.
But if you still want to control Custom Pixels according to Shopify’s consent settings, please read Simon’s excellent blog post: Prevent Shopify App and Custom Pixels from firing without consent. A brief summary: If you don’t use Shopify’s cookie banner Custom Pixels won’t be blocked by default. However, you can use Simon’s cheat code to disable custom pixels by default.
How to Find and debug Custom Pixels in your shop’s front-end?
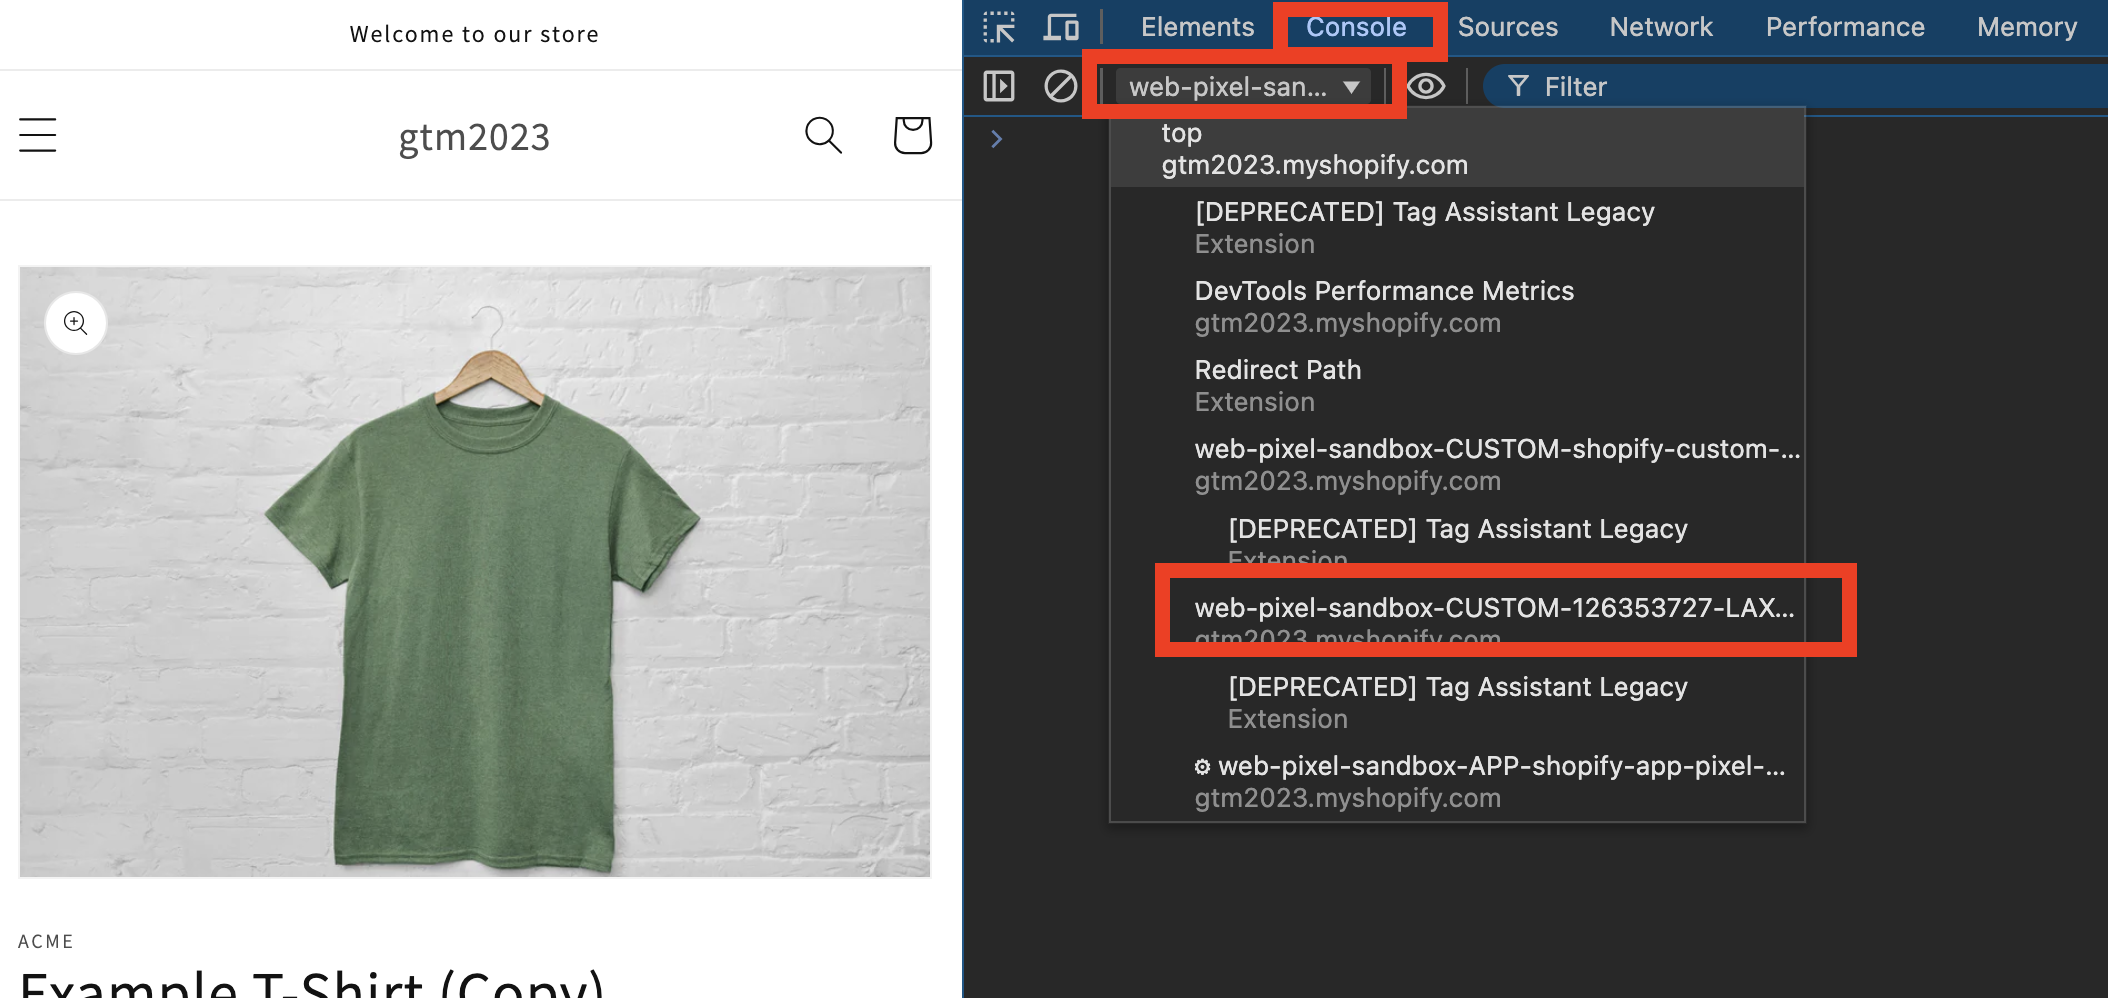
Open the console and click on top window anf search for something like web-pixel-sandbox-CUSTOM-XXXX-LAX…
Type dataLayer and voilà — you can see all custom pixel’s dataLayer events. Also, type document.location.href, and yes, you are inside an iframe with no access to the top window. You’ll need to get the data from the API (actual URL and page title for example) and somehow pass it to all your events and marketing pixels.
Good news, everyone — Custom Pixels exist not only on shop pages but also on the checkout page. But the bad news is that they are only in an iframe, and there’s no practical way to get information from the top window.
trekkie
And now, a few words about trekkie one of Shopify JavaScript library - the Dark Side of the Shopify Force. It’s an absolutely undocumented internal script that implements something plus gtag logic, including Google consent. You can only debug it by searching for gtag and Shopify API keywords, and testing deeper and deeper. This is the main source of the problems, especially when working with Google Consent Advanced Mode.
So, this is the Shopify landscape — and now, let’s try to land and implement tracking and consent (and try to survive).
Shopify Surprises
A quick note about the simple case: If you need:
- Only native integrations (apps) - no custom events or custom integrations
- Native consent banner - native banner customizations are enough for you
- Be GDPR-compliant with Google Consent Basic Mode
If it’s all what you (your clients) need - stay native! No custom solutions required. It works great: no consent - no events; everything is blocked. Well done but boring.
But if we go back to the goal described at the top of this blog post. You will face these interesting surprises:
Surprise 1:
You disabled the native banner and switched to a third-party CMP (via GTM), but still kept the native Google & YouTube app.
The problem is that when you disable the native banner, Shopify’s consent is not set. However, Shopify (through the trekkie script) will send a consent default granted gtag command. After that, it also sends a gtag event (e.g., page_view). So, all these events are sent with a granted consent status gcs:G111.
This happens before the CMP (via GTM) is loaded and sends its own consent default denied gtag command. As a result, all CMP consent commands are too late. This goes against Advanced Mode principles — consent should be denied by default.
Surprise 2:
With the same settings (native Google & YouTube app and CMP in GTM), checkout becomes a complete disaster.
Shopify (again, through trekkie) will set default consent to granted and send all events from the top window.
You don’t have any chance to inject your GTM into the top window. You could use Custom Pixels to inject GTM for checkout, but it will be inside an iframe, so all your gtag commands will be in a separate environment.
Additionally, you can’t inject any fixes in the theme.liquid template — not for checkout, no, no.
I see two ways to deal with these surprises:
Move everything to GTM – my preferred approach. No native integrations, just pure dataLayer based on Custom Pixel events.
Personally, I prefer to have two GTMs: one for the iframe and another for the top window (everywhere except checkout). Then, init connection between the iframe and the top window using a handshake technique, because we don’t know which container will load first.
And after handshake send all dataLayer events from the iframe GTM to the top window GTM. And from top GTM send events to GA4. Nothing new here — Simo described a similar technique back in 2020.
However, this is a full tracking relaunch: you’ll need to align all pixels, partners, and events — it’s like starting from scratch.
Sync Shopify and Google Consent Finally, we’re getting to the main point of this blog post.
The idea is to sync Google and Shopify consent: if Google consent is updated to
denied, we also update Shopify’s consent todenied, and Shopify willautomaticallyblock all native apps. This follows Google Consent Basic Mode.However, if we need to go beyond basic mode, we also need to implement all GA4 and Google Ads tags in GTM (based on Custom Pixels dataLayer events), but we’ll only send them if consent is denied (they will all have
gcs:G100). Because if consent is granted these events will be sent by native apps.
Why the Second Solution?
The second solution should be much faster. You don’t need to align all pixels and integrations with the client, nor do you need to ask developers to remove existing apps.
This solution mainly depends on you. You send instructions to the Shopify developers, and they help make Shopify (trekkie) more Google-friendly. After that, the stage is yours: you simply implement the standard CMP and GA4 logic inside GTM — just like our daily work.
That’s it! You keep all native integrations unattached, only implementing consent and adding extra non-consent pings. Simple.
Fixes
And now, the interesting part — show me the money code. Again, this isn’t a recommendation. It’s an example code that should be tested carefully and will depend on the third-party CMP you’re using.
How to Set Google Consent to Denied by Default, Even for Native Integrations (Google & YouTube App)
The idea is based on the recommendations from ConsentManager.net documentation
You could inject this script on top of theme.liquid:
  window.dataLayer = window.dataLayer || [];
  function gtag ()
  {
   if (!('cmploaded' in this))
   {this.cmploaded = false;}
   if (arguments.length > 1 && arguments[0] == 'consent' && arguments[1] == 'default' && !this.cmploaded)
   { return; }
   if (arguments.length > 1 && arguments[0] == 'set' && arguments[1] == 'developer_id.dMzk4MW')
   {this.cmploaded = true;}
   dataLayer.push(arguments);
  }
  window.dataLayer.push(['consent', 'default', {
   'ad_storage':         'denied',
   'analytics_storage':  'denied',
   'ad_user_data':       'denied',
   'ad_personalization': 'denied',
   'wait_for_update':    500
  }]);
So, we slightly tweak the gtag definitions and ignore all gtag consent default commands before the gtag set command with the correct developer_id, which is usually set by the CMP, or you could wait for the Shopify’s developer_id.
In the end of the snippet, we set the default consent to denied. Cool, right? All credits go to the team at ConsentManager.net.
As a result, Shopify’s (trekkie) gtag consent default commands are ignored, and the default consent is set to denied — Google Advanced Mode. The first surprise is fixed.
How to Set Shopify Consent to Denied by Default if You Use a Third-Party CMP
We can use the Shopify Consent API for this. One more code snippet in the theme.liquid:
| |
Here, we load the Shopify customerPrivacy API - line 22, and if the current state is not defined (empty string) - line 32, we initialize the default consent with false (consent denied) - line 13.
This means that by default, all pixels are blocked — not just GA4 and Google Ads, but also Meta and others. This is the default state for Google Consent Mode Basic.
Sync Shopify Consent with Google Consent
Next, we need to keep Google and Shopify consent in sync. I prefer to do this from GTM (using GTM Tag Templates), but this part is highly CMP-specific. The idea is the same as in the previous paragraph:
- Create GTM trigger based on CMP dataLayer consent update event
- Create variables with current Google
ad_storageandanalytics_storageconsent - Create tag that calls the
window.Shopify.customerPrivacy.setTrackingConsentcommand, which sets Shopify consent based on variables from the previous step.
Shopify and Third-Party CMPs - What Could Go Wrong
Here’s one important thing I found while debugging and reviewing code (with the help of an AI assistant): the customerPrivacy API depends on the _tracking_consent cookie. If your CMP blocks or deletes this cookie, the API won’t work.
So, if cookie blocking is enabled in your CMP, don’t forget to add the _tracking_consent cookie to the exclusion list. It’s Shopify’s totem cookie, and nobody can touch it.
How to Implement Google Advanced Mode Using Shopify Custom Pixels
Great, at this point, you should have already implemented Google Basic Mode. The final step is Advanced Mode. You’ll only need to ask Shopify developers to create a Google Tag Manager custom pixel.
One more useful link: the list of standard Shopify events, which provides a well-documented structure for events and context. Please be aware that not all ecommerce events follow the same structure.
And finally, for GTM triggers, you should fire all GA4 and Google Ads pixels only if consent is not granted. Because if consent is granted these events are sent by native apps.
One last note, If you have GTM in both the top window (using theme.liquid) and an iframe (using Custom Pixels), make sure that you don’t send the same events twice.
Final Words
I think that’s it — these are my lessons learned after spending some time with the Alien Shopify. I hope some of them will help you better understand Shopify tracking and implement your own integrations.
Special thanks to George Clements and Timur Kuchushev — they shared some awesome Shopify tricks and techniques at MeasureCamps this year. These guys are really great, and it’s a pleasure for me to connect with such experienced tracking developers. That’s why I highly recommend attending MeasureCamps (thanks to Peter O’Neill and teams)
And, if you’re into tracking and analytics, I also suggest attending Super Week, a very special conference. And I hope to see you there next month!
Good luck to all web analysts who have just landed in the beautiful and intriguing Shopify World.
